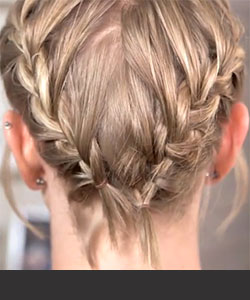
Cornrowing Hair Using Extensions
While Cornrowing hair was originally used as a way to manage kinky/wavy hair textures, over the years varying degrees of creativity have been injected into the original art form, including adding hair extensions to create individual fashion statement. Now, it is almost as common to see cornrowed extensions as it is to see cornrows without.
If you've been thinking about adding cornrowed extensions to your hair, you'll be happy to know you can do it yourself. By following a few steps, you will have beautifully braided your hair in no time!
Buying Extension
Before you can start the cornrowing process, you must buy some hair. First, you'll have to choose between synthetic and human hair. Since cornrows tend to only stay "fresh" for a couple of weeks, buying synthetic hair is a more cost-effective route to take. It's available almost anywhere that hair products are sold, and can be priced as low as $0.99 a bag. Once you've purchased your ideal hair extensions, you are ready for the next step: pre-braid care.
Pre-Braid Hair Care
Pre-braid care is an essential aspect of extension braiding. It is important that you condition your hair extensively with both an after-shampoo conditioner and good leave-in conditioner (one that requires you to wear a conditioning cap for at least 20 minutes) before adding extensions to avoid hair deterioration while in the braids. Also, make sure to clip your ends and oil your hair and scalp with a good conditioning oil. After this pre-braid care is complete, you're ready for the next step: braiding your hair!
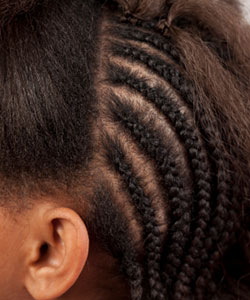
Inserting Cornrows
When you're ready to cornrow your hair, it's good to set aside several hours and devise a braiding plan. Most times, you can find a picture of a braided style you like then work with that.
To get started, part your first row in a straight line with a rat-tooth comb (a long comb with small teeth on the top and a long narrow base). Pull the rest of your hair away from this row so that you won't accidentally incorporate loose strands into your braids.
Next, separate a small section of hair from the beginning of your parted section. Pinch off the same thickness from your hair extensions then find the middle of the extension, leaving an equal amount of hair hanging on either side.
Now, wrap the middle of the extension around your separated section of hair allowing the extension length to fall on either side. While holding your separated section of hair between your thumb and forefinger, press one side of the extension against your own hair so that it is between the other hand's thumb and forefinger, effectively switching hands so that the same thumb and forefinger are pressing both your hair and the extension together.
Use your free hand to pull the other side of the extension, creating the third strand to braid (your hair and the extension between your thumb and forefinger are the first two strands). Simply begin cornrowing all three strands together as you normally would cornrow (two of your three strands will always have extension hair incorporated). As you begin braiding past the nape of your neck, you will likely have to separate the two extensions strands into three. Repeat this process for the remaining hair, row by row, until you're finished.
Care and Removal
While your extensions are inserted, you want to oil your hair everyday to prevent dryness and breakage. Typically, once the braids become fuzzy, it's time to remove them, which is easily done by unbraiding them from the bottom. You can also cut the extension some to speed up the process as long as you don't cut off your own hair.
What's great about cornrowing your hair is that you can create as many designs as your imagination allows. After browsing magazines and the Internet for ideas, you can easily become a cornrowing connoisseur and the envy of your friends - that is, if they're not trying to get you to braid their hair.